For many of these crafts I'm trying to make use of things I already have and art materials I may not have used for a while. Our school has a huge box of donated sofa fabric swatches and so I asked if I could use some of them in my 40days project. However it was hard deciding which idea to use them for! I'd thought about wall hangings and pencil or glasses cases. In the end I decided to make fabric boxes - don't we all need a bit of storage?
I came across a nice little website called www.tipjunkie.com where I've followed their instructions for fabric boxes. There seems to be lots of other great crafting ideas on this site so I'll no doubt revisit it.

 I've started by cutting the fabric swatches into 14cm squares. I needed five for each box - no lid. On one square I've made a sweet rabbit collage. I started by embroidering flowers and leaves. Apparently I've used split stitch (so says my eldest daughter) for the foliage and detached chain stitch for the petals.
 The rabbit is made from some fluffy material I've had aside for making teddy bears for about ten years and attached with some fusible web - I think that's what its called! To finish, I made a small Suffolk puff flower with button centre and leaves from good old self-adhesive felt.
It's probably easier to make fabric boxes by using material cut out in the shape of a cross and simply folding up the sides. However, I've used five separate squares sewn together - sides first, bottom last - on a machine - to make a box shape.
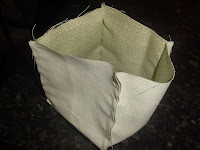
For the inner I cut a piece of green material into the shape of a cross, folded it in half and sewed up the outer sides. I then unfolded and refolded to sew up the other sides.
 |
| Finished inner |
I placed the finished outer inside the finished inner (!), pinned and sewed them together round the top edge. I left one side open so that I could then turn the whole thing inside out and hand sewed the last edge closed.
Though this sounds like a straightforward process, it did take me some time to work out how to sew the inner and outer together. My husband did suggest that I could have put the inner into the outer and simply sewed some edging or bias binding around the top, saving us the trouble of turning it inside out! As I've used sofa fabric swatches I didn't bother using interfacing to reinforce the box - it holds its shape ok specially when it's full of stuff!
 |
| Another clue to another day's project?! |


No comments:
Post a Comment